2025 Alfa Romeo Giulia
midsize luxury car / 4-door sedan
Small overlap front
The small overlap front evaluation consists of a driver-side and a passenger-side component. This vehicle has an incomplete rating because it has been tested only on one side.
Driver-side
- Rating applies to 2017-25 models built after May 2017
Tested vehicle: 2017 Alfa Romeo Giulia Ti 4-door
The Alfa Romeo Giulia was introduced in the 2017 model year. Beginning with 2017 models built after May 2017, the front-end structure was modified and the door hinge pillar and sill were reinforced to improve occupant protection in small overlap and moderate overlap frontal crashes. (Information about when a specific vehicle was manufactured is on the certification label typically affixed to the car on the driver door or adjacent B-pillar.)
| Evaluation criteria | Rating |
|---|---|
| Overall driver-side evaluation | |
| Structure and safety cage | |
| Driver injury measures | |
| Head/neck | |
| Chest | |
| Hip/thigh | |
| Lower leg/foot | |
| Driver restraints and dummy kinematics | |

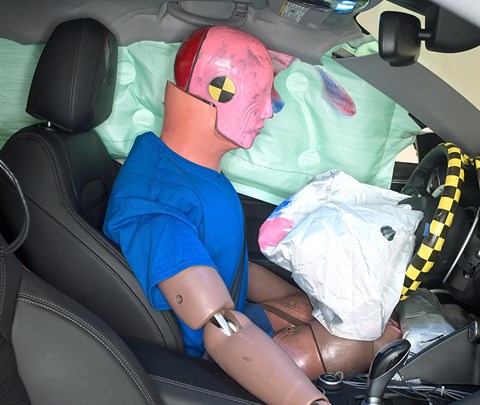
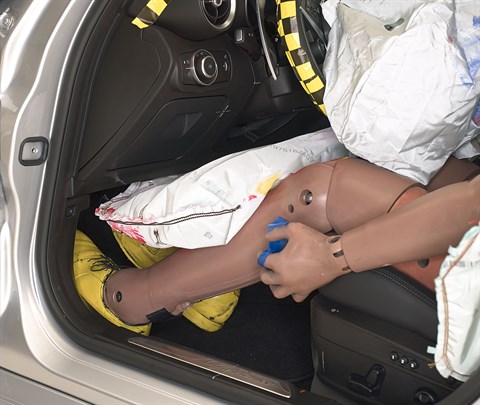
Action shot taken during the small overlap frontal crash test.
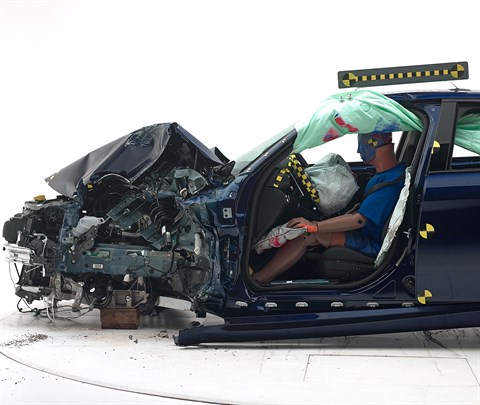
The dummy's position in relation to the door frame, steering wheel, and instrument panel after the crash test indicates that the driver's survival space was maintained well.

The frontal and side curtain airbags worked well together to keep the head from coming close to any stiff structure or outside objects that could cause injury.
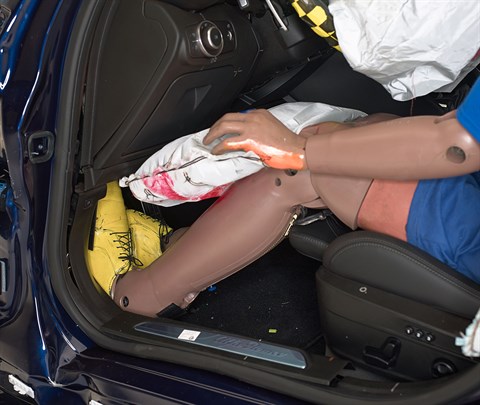
The driver's space was maintained well, and risk of injuries to the dummy's legs and feet was low.
Measures of occupant compartment intrusion on driver side
| Evaluation criteria | Measurement |
|---|---|
| Test ID | CEN1718 |
| Lower occupant compartment | |
| Lower hinge pillar max (cm) | 5 |
| Footrest (cm) | 13 |
| Left toepan (cm) | 9 |
| Brake pedal (cm) | 12 |
| Parking brake (cm) | |
| Rocker panel lateral average (cm) | 1 |
| Upper occupant compartment | |
| Steering column | 0 |
| Upper hinge pillar max (cm) | 4 |
| Upper dash (cm) | 5 |
| Lower instrument panel (cm) | 5 |
Driver injury measures
| Evaluation criteria | Measurement |
|---|---|
| Test ID | CEN1718 |
| Head | |
| HIC-15 | 262 |
| Peak gs at hard contact | no contact |
| Neck | |
| Tension (kN) | 1.0 |
| Extension bending moment (Nm) | 14 |
| Maximum Nij | 0.26 |
| Chest maximum compression (mm) | 30 |
| Femur (kN) | |
| Left | 1.4 |
| Right | 1.1 |
| Knee displacement (mm) | |
| Left | 1 |
| Right | 2 |
| Knee-thigh-hip injury risk (%) | |
| Left | 0 |
| Right | 0 |
| Maximum tibia index | |
| Left | 0.52 |
| Right | 0.53 |
| Tibia axial force (kN) | |
| Left | 2.8 |
| Right | 2.4 |
| Foot acceleration (g) | |
| Left | 117 |
| Right | 81 |
Moderate overlap front: original test
Rating applies to 2017-25 models built after May 2017
Tested vehicle: 2017 Alfa Romeo Giulia Ti 4-door
The Alfa Romeo Giulia was introduced in the 2017 model year. Beginning with 2017 models built after May 2017, the front-end structure was modified and the door hinge pillar and sill were reinforced to improve occupant protection in small overlap and moderate overlap frontal crashes. (Information about when a specific vehicle was manufactured is on the certification label typically affixed to the car on the driver door or adjacent B-pillar.)
| Evaluation criteria | Rating |
|---|---|
| Overall evaluation | |
| Structure and safety cage | |
| Driver injury measures | |
| Head/neck | |
| Chest | |
| Leg/foot, left | |
| Leg/foot, right | |
| Driver restraints and dummy kinematics | |

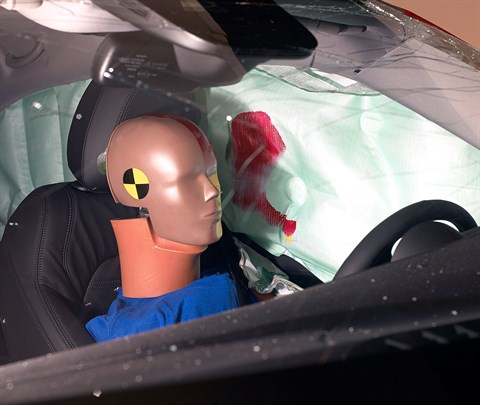
Action shot taken during the moderate overlap frontal crash test.
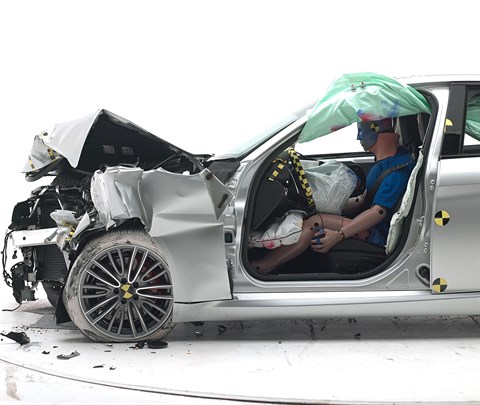
The dummy's position in relation to the steering wheel and instrument panel after the crash test indicates that the driver's survival space was maintained very well.
Smeared greasepaint indicates where the dummy's head contacted the side curtain airbag during rebound.
The driver's space was maintained well, and risk of injuries to the dummy's legs and feet was low.
Measures of occupant compartment intrusion on driver side
| Evaluation criteria | Measurement |
|---|---|
| Test ID | CEF1704 |
| Footwell intrusion | |
| Footrest (cm) | 2 |
| Left (cm) | 2 |
| Center (cm) | 2 |
| Right (cm) | 1 |
| Brake pedal (cm) | 4 |
| Instrument panel rearward movement | |
| Left (cm) | 0 |
| Right (cm) | 0 |
| Steering column movement | |
| Upward (cm) | -2 |
| Rearward (cm) | -8 |
| A-pillar rearward movement (cm) | 0 |
Driver injury measures
| Evaluation criteria | Measurement |
|---|---|
| Test ID | CEF1704 |
| Head | |
| HIC-15 | 171 |
| Peak gs at hard contact | no contact |
| Neck | |
| Tension (kN) | 1.0 |
| Extension bending moment (Nm) | 11 |
| Maximum Nij | 0.22 |
| Chest maximum compression (mm) | 34 |
| Legs | |
| Femur force - left (kN) | 0.7 |
| Femur force - right (kN) | 1.0 |
| Knee displacement - left (mm) | 2 |
| Knee displacement - right (mm) | 2 |
| Maximum tibia index - left | 0.43 |
| Maximum tibia index - right | 0.33 |
| Tibia axial force - left (kN) | 2.0 |
| Tibia axial force - right (kN) | 2.4 |
| Foot acceleration (g) | |
| Left | 60 |
| Right | 63 |
Side: original test
Rating applies to 2017-25 models
Tested vehicle: 2017 Alfa Romeo Giulia Ti 4-door
The Alfa Romeo Giulia was introduced in the 2017 model year.
| Evaluation criteria | Rating |
|---|---|
| Overall evaluation | |
| Structure and safety cage | |
| Driver injury measures | |
| Head/neck | |
| Torso | |
| Pelvis/leg | |
| Driver head protection | |
| Rear passenger injury measures | |
| Head/neck | |
| Torso | |
| Pelvis/leg | |
| Rear passenger head protection | |
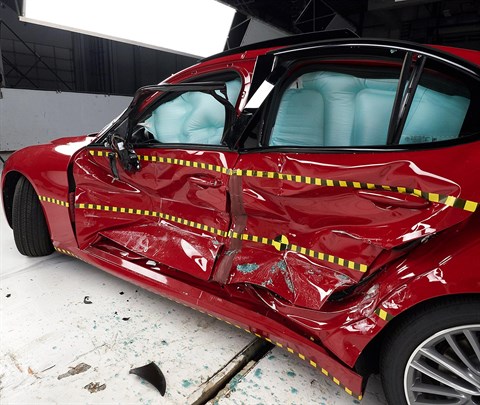
View of the vehicle just after the crash test.

View of the vehicle after the crash with doors removed, showing the side airbags and damage to the occupant compartment.
Smeared greasepaint shows where the driver dummy's head was protected from being hit by hard structures by the side curtain airbag.

Smeared greasepaint shows where the rear passenger dummy’s head was protected by the side airbag.
Measures of occupant compartment intrusion on driver side
| Test ID | CES1707 |
|---|---|
| B-pillar to longitudinal centerline of driver's seat (cm) | -17.5 |
| Negative numbers indicate the amount by which the crush stopped short of the seat centerline. | |
Driver injury measures
| Evaluation criteria | Measurement |
|---|---|
| Test ID | CES1707 |
| Head HIC-15 | 87 |
| Neck | |
| Tension (kN) | 0.9 |
| Compression (kN) | 0.5 |
| Shoulder | |
| Lateral deflection (mm) | 34 |
| Lateral force (kN) | 1.3 |
| Torso | |
| Maximum deflection (mm) | 35 |
| Average deflection (mm) | 33 |
| Maximum deflection rate (m/s) | 3.44 |
| Maximum viscous criterion (m/s) | 0.53 |
| Pelvis | |
| Iliac force (kN) | 1.0 |
| Acetabulum force (kN) | 0.8 |
| Combined force (kN) | 1.5 |
| Left femur | |
| L-M force (kN) | 0.3 |
| L-M moment (Nm) | 115 |
| A-P moment (Nm) | 34 |
Passenger injury measures
| Evaluation criteria | Measurement |
|---|---|
| Test ID | CES1707 |
| Head HIC-15 | 116 |
| Neck | |
| Tension (kN) | 0.4 |
| Compression (kN) | 0.9 |
| Shoulder | |
| Lateral deflection (mm) | 20 |
| Lateral force (kN) | 0.8 |
| Torso | |
| Maximum deflection (mm) | 31 |
| Average deflection (mm) | 22 |
| Maximum deflection rate (m/s) | 3.44 |
| Maximum viscous criterion (m/s) | 0.35 |
| Pelvis | |
| Iliac force (kN) | 1.8 |
| Acetabulum force (kN) | 1.2 |
| Combined force (kN) | 2.9 |
| Left femur | |
| L-M force (kN) | 0.4 |
| L-M moment (Nm) | 38 |
| A-P moment (Nm) | 27 |
Child seat anchors
Rating applies to 2017-25 models
| Evaluation criteria | Rating |
|---|---|
| Overall evaluation | |
| Vehicle trim | Ti |
| Seat type | leather |
This vehicle has 2 rear seating positions with complete child seat attachment (LATCH) hardware.
It has 1 additional seating position with a tether anchor only.
| Evaluation criteria | Rating |
|---|---|
| Overall evaluation | |
| Vehicle trim | Ti |
| Seat type | leather |
| Rating icon | Rating |
|---|---|
| G | Good |
| A | Acceptable |
| M | Marginal |
| P | Poor |
| Seating positions that rely on borrowed lower anchors or have only a tether anchor available are not rated. | |
thether anchor symbol | Tether anchor |
lower anchor symbol | Lower anchors |
| Lower anchor(s) can be borrowed from adjacent positions(s) | |
| No hardware available |
Details by seating position
| Position | Rating |
|---|---|
| 1 | |
| Tether anchor | |
| easy-to-find location | |
| no other hardware could be confused for anchor | |
| Lower anchors | |
| too deep in seat | |
| not too much force needed to attach | |
| difficult to maneuver around anchors | |
| 2 | |
| Tether anchor | |
| easy-to-find location | |
| no other hardware could be confused for anchor | |
| Lower anchors | |
| none available | |
| 3 | |
| Tether anchor | |
| easy-to-find location | |
| no other hardware could be confused for anchor | |
| Lower anchors | |
| too deep in seat | |
| not too much force needed to attach | |
| difficult to maneuver around anchors |
Seat position 21
| Lower anchor A | |
|---|---|
| Open access rated | Yes |
| Depth | Not visible |
| Force (lbs) | 0 |
| Clearance angle (degrees) | 36 |
| Lower anchor B | |
| Open access rated | Yes |
| Depth | Not visible |
| Force (lbs) | 0 |
| Clearance angle (degrees) | 34 |
| Tether anchor | |
| Location | Rear deck |
| Confusing hardware present | No |
| Has contrasting label within 3 inches of tether anchor |
Yes |
| Tether anchors can be accessed while seatback is properly positioned for use of LATCH |
Not measured |
Seat position 22
| Lower anchor A | |
|---|---|
| No lower latch for this seat position | |
| Lower anchor B | |
| No lower latch for this seat position | |
| Tether anchor | |
| Location | Rear deck |
| Confusing hardware present | No |
| Has contrasting label within 3 inches of tether anchor |
Yes |
| Tether anchors can be accessed while seatback is properly positioned for use of LATCH |
Not measured |
Seat position 23
| Lower anchor A | |
|---|---|
| Open access rated | No |
| Depth (cm) | 2-4 |
| Force (lbs) | 2 |
| Clearance angle (degrees) | 32 |
| Lower anchor B | |
| Open access rated | Yes |
| Depth | Not visible |
| Force (lbs) | 0 |
| Clearance angle (degrees) | 34 |
| Tether anchor | |
| Location | Rear deck |
| Confusing hardware present | No |
| Has contrasting label within 3 inches of tether anchor |
Yes |
| Tether anchors can be accessed while seatback is properly positioned for use of LATCH |
Not measured |